How to Connect to the Outbrain API - Authenticate using Python
There are thousands of reasons why you would want to connect to the Outbrain Amplify API. Regardless of yours, you will first need to go through the authentication. Here’s our guide of how to.
This is a part in our series of how to leverage the APIs of Native Advertising Platforms for smarter campaign management and reporting. A while back we wrote an article on the authentication process and how to connect to the Taboola API using python. Make sure to also check that out if you looking to work their API. Similarly to then, we will be using python through Jupyter Notebook. For reference, here’s the API documentation for Outbrain
Whether you’re annoyed by the manual effort of uploading piles of images and headline combinations or frustrated by not being able to structure reporting data the way you need it. The Outbrain Amplify API will help you maintain your sanity. How do you get started with it though?
Access to the Outbrain API - Do you have it?
In order to be able to use the Outbrain Amplify API as an advertiser you first need to get approval from Outbrain. If you don’t yet have it but already have an advertiser account for Outbrain, you can request Outbrain API access here. However, it might be faster and simpler to just directly ask your Outbrain account manager for access instead.
If you are unsure if you already gotten approved for using the API or not. There is one easy way to check it. Log into your account on my.outbrain.com. In the top right corner it should say: Logged in as name@email.com. Click on it and check if Amplify API Token appears in the drop down menu. See screenshot below.
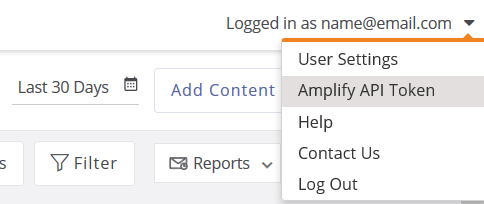
If it’s there you have already been approved for using the API and can move to the next step. Otherwise get in touch with your account manager or use the link above to request it.
You can actually use the link from this drop down to generate a Token directly in the interface that can be used for the API. As most likely, you would want to avoid manually logging in to the interface and collecting the Token when using the Outbrain API We are however going to explain how to generate one directly in the API.
The Outbrain Amplify API Token
What is the Outbrain API Token
The Outbrain Amplify API Token needs to be included in every request that you make to their API. It is what is telling the API which user the request is coming from and that you actually are allowed to make a request on the behalf of a certain marketer account. Understanding how users and marketers are structured for Outbrain is not relevant for the scope of this guide. But if you are interested, we have a more detailed explaination on Outbrain users and marketers in our article on the Outbrain Marketer ID.
The Token is then representing your credentials as a logged in user. There are a few things to keep track of regarding the Outbrain Token:
- Once you generate a new
Token, it is valid for 30 days - You can keep generating new
Tokenswith the previous still working. - Important - only two new can be created per hour. In other words, keep track of them and try to avoid unnecessarily generating new
Tokens. Frustrating to wait for an hour before you can continue working. - The
Outbrain APIis restricted to 30 requests per second andToken. This is more than enough for almost all intents and purposes.
How to generate an Outbrain API Token
We already covered one of the two ways of creating an Outbrain Token, manually from the user interface at my.outbrain.com. Now, more interestingly, how do you do it directly from the API.
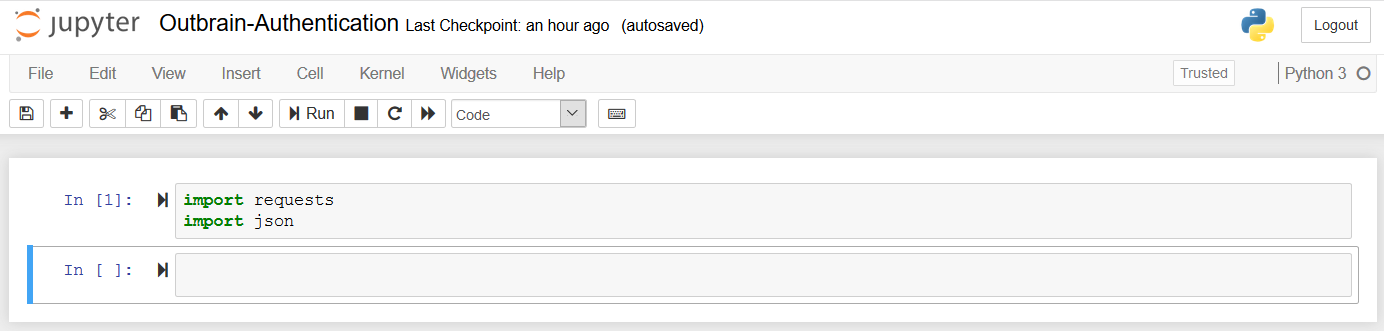
Start up Jupyter Notebook, or whichever IDE you are using to run Python. And let’s import the same packages we used for the guide of how to access the Taboola API.
import requests
import json
Run it by holding shift and clicking enter. If there are no errors if should look something like the following screenshot:
We will now need to define the Outbrain API url, and the username and password that is used to login to your Outbrain account.
The Outbrain API is always using the https://api.outbrain.com/amplify/v0.1 as it’s base and different extension for various purposes. The relevant for authenticating and generating a Token, and thus for us now, is /login.
url = 'https://api.outbrain.com/amplify/v0.1'
username = 'name@email.com'
password = 'xxxxxxxxxxxx'
Then we are going to make a GET request to the /login resource using our username and password. These are passed using HTTP Basic Authentication. No worries if you don’t know what this is, you don’t need to for now.
The request will then look like this:
response = request.get(url + '/login', auth=requests.auth.HTTPBasicAuth(username, password))
Let’s check whether we got request succeeded and what the response was.
response.ok
response.json()
You should now have the following output.
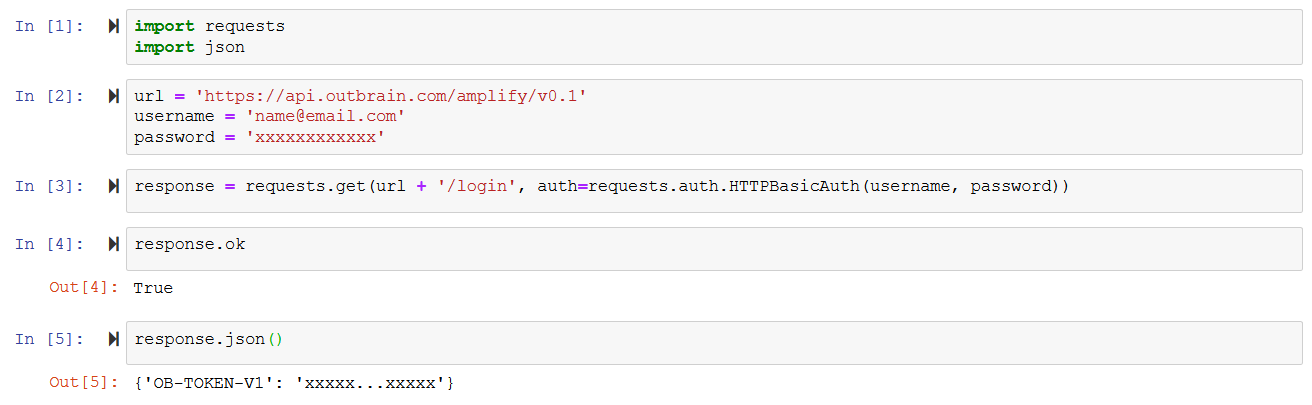
The True from testing response.ok indicates we got a 200 Status Code (working like expected). In case it returns False there will likely be a message in the response from response.json() that says what went wrong.
We now successfully authenticated and generated a Token. It is part of the reponse and called OB-TOKEN-V1 (Outbrain Token version 1) This should be used for all subsequent requests to the Outbrain Amplify API. But first, let’s save it.
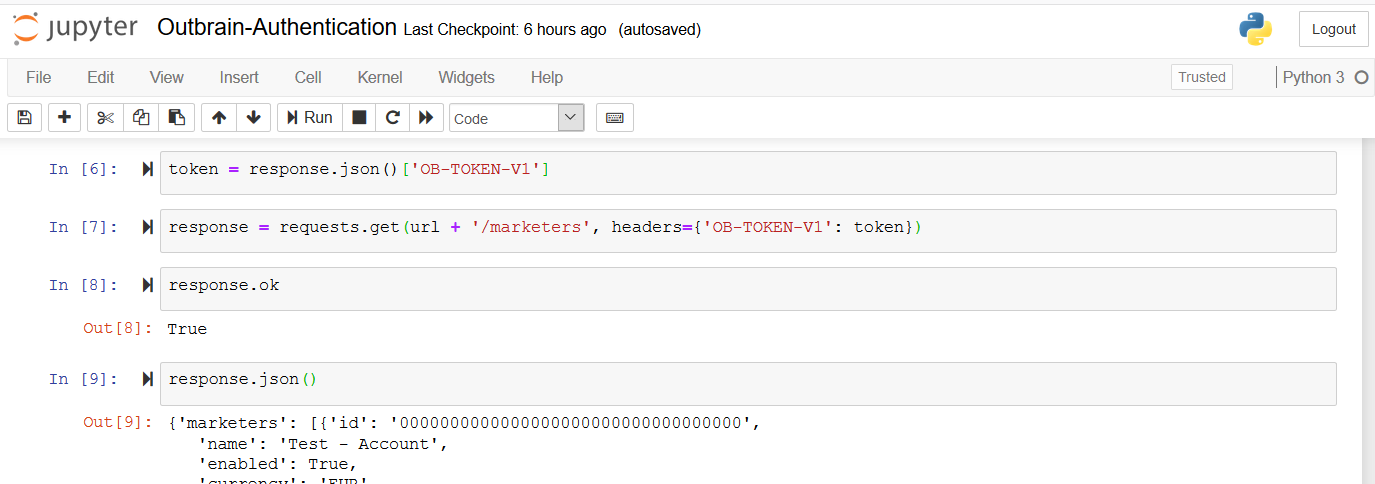
token = response.json()['OB-TOKEN-V1']
Now let’s see it in action!
Master Advertising On Outbrain
Register for the ultimate native advertising course and get exclusive insights into building successful Outbrain campaigns.

Testing the Outbrain Amplify Token
With the Outbrain Token in hand, you can now make requests to the API for your user. Let’s see how the Token used in a request and confirm that it works.
We will test listing the ‘marketers’ connected to this specific user that we just authenticated. To do that we use the /marketers resource.
The request will look like this:
response = requests.get(url + '/marketers', headers={'OB-TOKEN-V1': token})
The Token saved from previously is now included in the headers of the request.
Again checking if the request was okay and what the response is:
response.ok
response.json()
This should give you that response.ok returns True again and one or more marketers listed in the reponse from response.json(). Then it is working like it should and your result are looking something like:
What’s your next step?
If you got through the previous step, you now have access to Outbrain’s API and can start playing around. Regardless of whether you want to use it for checking the approval status of new creatives or collecting reporting data. Just keep including the Token in the header of all future requests, and generate a new one whenever needed.
What do you want to use the Outbrain Amplify API for? Share with us on Linkedin or Twitter, and let us know if there’s something you would like us to focus on in a future article.
Thanks for reading our guide on how to connect to the Outbrain API. We will keep releasing similar articles on how to take advantage of the APIs of Native Platforms. Check out the Outbrain API documentation for more information on specific requests.
If you are looking for a better way to work with, manage and optimize campaigns across native advertising platforms, check out our native advertising management platform. We integrate with the largest networks and offer on top features and insights.